Upper Midwest Environmental Sciences Center
|
|
| Home/ Overview/ Science Programs/ Data Library/ Products and Publications/States/ Rivers/Teachers and Students/ Links/ Contact/ Search |
LTRMP Fish Component |
Preface |
This tutorial is presented to orient you for electronic data entry of LTRMP fish collections for 2003 and beyond. The goal of this tutorial is to introduce you to the key elements of the application so that LTRMP fish data can be efficiently and accurately recorded in electronic format directly at the time of collection. We believe that the interface is quite self explanatory; Dave Hansen has made the electronic data entry interface appear remarkably similar to the paper data sheets we have used in previous years. Below we present the key elements of the application and provide you some pointers for efficiently entering your data. Major Sections: |
Downloading and Installing the Application |
| The LTRMP data correction
application can be downloaded from the following URL: The file is named: fyy_appccc.zip and is located in the lower right section of the table at the above link. In the file name convention above, yy is the last 2 digits of the year and ccc is the version number (always use the most current version). Instructions:
|
Main Menu |
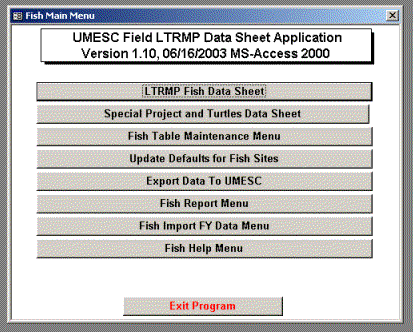
| Open the application by double-clicking on its icon (either on your desktop, if you created a shortcut or in Windows Explorer under "C:\ltrmp_fish") The LTRMP Fish Component Laptop Data Entry Application will open with the main menu displayed.
The top button labeled "LTRMP
Fish Data Sheet" opens the data entry interface.
The other buttons launch maintenance, import, export, and reporting
subroutines and will be discussed later as appropriate. |
Data Entry Page |
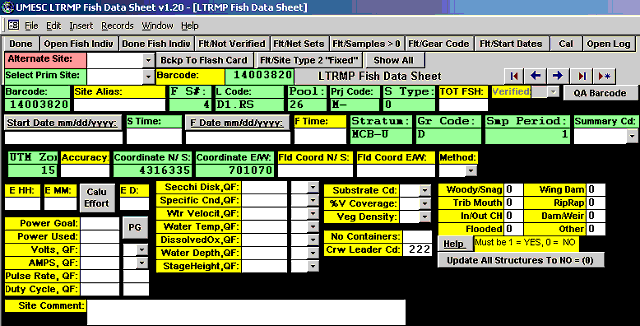
| At the main menu, click on the button labeled "LTRMP Fish Data Sheet". This will access the main data entry form. The layout and flow of the data entry form follows the old paper datasheets quite closely. Major differences are that the electronic sheet only allows pre-loaded, selectable data for many fields (e.g., stratum, gear, period, summary, etc...) and has a different interface for entering individual records. The electronic datasheet can be broken into 2 sub-sections, a SITE RECORD section and a FISH INDIVIDUAL section. The SITE RECORD section is always open, and the FISH INDIVIUAL section overlays the SITE RECORD section when it is opened. |
Site Record sub-section - Considerations for data entry |
| At the very top of the main data entry form, there is a row of gray buttons with black text. These allow the user to perform various tasks outside of an individual record. The first button "Done" will exit back to the main menu. "Open Fish Indiv" will open the Fish Individual form and hide the Site Record form. "Done Fish Indiv" closes the Fish Individual form and reveals the Site Record form. Also, in the first row, 5 buttons are available beginning with the text "Flt/...". These buttons launch filtering macros based on the descriptive text suffix unique to each button (e.g., Not Verified). These filters are designed to aid maintenance/navigation of the records that have been entered previously and to assist you in QA checks prior to submitting the data to UMESC. There is one additional filter in the second row that performs a similar function. The button labeled "Cal" opens a calculator for you, and the button labeled "Open Log" opens an electronic log book for record keeping comments. Use of the activity log is encouraged. The second row contains a button termed "Show All" that refreshes all records following an earlier filter. The button labeled "Bckp to Flash Card" performs an instantaneous dump of the database to the flash card, for backing up the data. This should be done several times each day during data collection. |
Data entry - Site Record sub-section |
Electronic data entry of a collection begins with information particular to a sampling site. Thus we will begin here. In the upper left-hand corner of the SITE RECORD section, the user may select a pre-loaded PRIMARY site from the drop-down list. Sites are sorted first by time period, then by location code. When you find the site you are looking for, double-click on it to load it into the form. You are now ready to enter data into this record. Alternate sites may be selected in the same way. However, the application will prompt you for a time period during the loading process, to ensure you select the correct site. For both primary and alternate sites, when a start date is entered, the application will check the date against the sampling time period beginning and ending dates to ensure you have selected a site that is within the correct time period for the date you have entered. If a discrepancy is noted, an error message will appear to warn you, but the application will allow you to proceed. You will notice that many of the fields are pre-loaded with data. Those fields with a green background are both required and non-editable fields. Fields with a green label and a white background are required fields, but can be edited. To enter a start date/time or finish date/time, you may click on the gray buttons adjacent to those fields for machine capture of the data, or you may enter/edit them yourself.
Non-required data fields are white and field titles are highlighted in yellow. These are quite self-explanatory and I will not go into much detail on these. Suffice to say that many can be selected from drop down menus while other require keyed-entry. A few points should be made though.
|
Individual Fish Sub-section - Considerations for data entry |
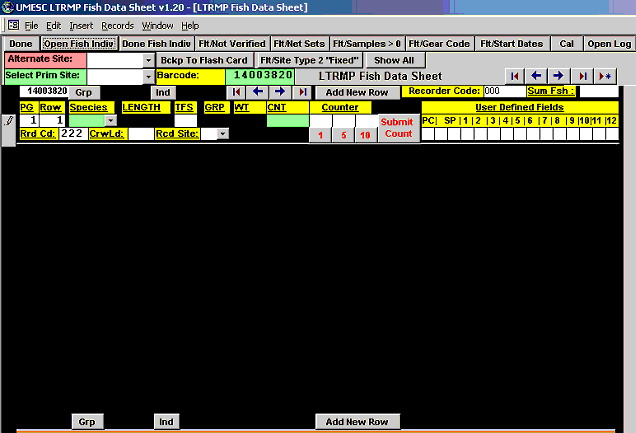
| Once the SITE RECORD portion of the datasheet is complete, you are ready to begin entering INDIVIDUAL FISH. Looking at the data entry interface below, a few things are apparent.
|
Data entry - Individual Fish Sub-section |
| There are two ways to enter FISH INDIVUDUAL records. The first is to type them by hand directly into the rows. The second is by using the toggle buttons. These are explained, as follows: Direct Typing into Rows
Toggle Button
Entry
|
QA and Verifying Records |
|
Once
records have been QA checked, you may elect to Verify those record
using the drop down menu labeled "Verified" just to the left of
the QA button. It is recommended you verify COMPLETED
collections once per time period, then export to UMESC.
DO NOT verify incomplete records.
Simply leave them in place until you can get the preserved fish
worked up. Collections will not export until verified.
The
crew leader should perform verification.
By doing so, the crew leader is certifying that the data are complete
and accurate to the best of their knowledge. |
Special Project and Turtle By-catch |
| The second option on the main menu allows for entry of special project information and turtle bycatch from routine LTRMP collections. These data were entered into the routine LTRMP monitoring database through 2002, but are being separated from 2003 and beyond, because of the problems they created in managing, serving, and analyzing the routine LTRMP data. This section of the data entry application functions similarly to the routine monitoring sections, except that there are no pre-loaded fields, and the rules for many of the fields are turned off to allow users to enter a wider variety of data. All LTRMP-sponsored contract work or any projects that are intended to have the data served by UMESC must have approved project codes, or the data will not be stored, managed, or served by UMESC. Project codes can only be selected from the list of approved codes. For emergency or response sampling, an "EMER" code is available, but these data will not be supported by UMESC, unless the project code is changed later. New project codes will be approved by the Fish Component Specialist, and added to the select list of available special project codes to choose from. To submit a new project, notify the Fish Component Specialist of your intent to begin a new project at least two weeks before sampling begins. Required information consists of: WHO is conducting the project, WHAT is the purpose of the project, WHERE will it be conducted, WHEN is the starting date and projected ending date, and HOW will the sampling be done. Once a project is approved, the Database Manager will update the file named "C:\ltrmp_fish\lkda_fish.mdb", and send it to you to paste into your "C:\ltrmp_fish" folder. The new project code will then be available. Turtle data may be entered under the "TURT" special project code. To link the turtle records back to routine monitoring collections, it is suggested that you record the sample barcode from the routine monitoring collection in the SITE ALIAS field of the special projects database. This will allow cross-linking of the two databases later, if desired. Please note: For logistical and QA/QC reasons, sample barcodes from the special project database do not match those from the routine monitoring database. There is no EXPORT option
for special project data. However, the data are easy to
locate and extract manually. In the "C:\ltrmp_fish"
folder, there is a file named "fish_sp_data.mdb".
To extract special project data from the application, simply copy
this file to another location, and open it with Microsoft ACCESS.
You can then work with it in ACCESS, or export it to another format. |
File Management Considerations |
| The initiation of electronic data recording in the field bestows a considerable level of responsibility to the field station staff because of the innate complexity associated with proper data management. It is important to recognize this complexity, and staff need to be comfortable with the operating environment of the computers, as well as file management and structure. Essentially, there are three file storage units to be considered for this application: the field computer hard drive, the flash card, and an independent, portable storage medium (floppy, CD, Zip disk, etc). The data are initially recorded and stored on the field computer hard drive, then backed up to the flash card, and then transferred to both UMESC and an independent, portable storage medium. The independent storage medium will allow you to retain your files and application in the event that the field computer is lost. Storage locations should be secure, fireproof, and remote from your field computer, if possible. Whenever you are going to delete or export files, always make sure you have backed up both the application and the data file before commencing. After
exporting files to UMESC, you should also make a copy of each
export file on a CD or zip disk, and keep these in the same, secure
location as the copies of your application and data files. |
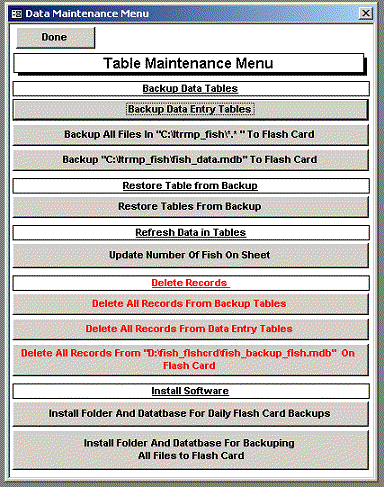
Data Maintenance Menu |
| A suite of maintenance utilities are available from the main menu of the entry application. The white bars indicate major sections and the gray bars initiate specific maintenance actions. Within the "C:\ltrmp_fish" folder, the file"fish_data.mdb" contains the information you record in the field. To back up this file to the laptop hard drive, click on the button labeled "Backup Data Entry Tables". This procedure will update a file named "fish_data_bkup.mdb" with the current contents of your application, which is also stored within the "C:\ltrmp_fish" folder. Since the actual data and the backups are stored within the same folder on the laptop hard drive, it is also recommended that you back up the entire"C:\ltrmp_fish" folder to the flash card. This is done by: 1) installing the flash card utility software, as detailed below (Install Software), and then 2) backing up the entire application by clicking on the button labeled "Backup All Files in C:\ltrmp_fish\*.* to Flash Card"). You should also keep an additional copy of the entire application on a zip disk or CD by copying the entire "C:\ltrmp_fish" folder from the laptop hard drive to a remote computer, then transferring to the storage medium. This should be done weekly. Within the "C:\ltrmp_fish" folder, the file"fish_data.mdb" is the one that contains the information you record in the field. Again, it is very important to maintain current copies of this file in separate locations, so data are not lost in the event of a hard drive crash or loss of the computer. Use the button labeled "Backup "C:ltrmp_fish\fish_data.mdb" to Flash Card" to back up the data files to the flash card. Do this after each collection, and transfer to a remote storage medium daily. Please note: A hard drive on another computer is helpful in storing and transferring files, but should not be relied upon as a backup because of the possibility of hard drive failure or other damage. Restore Tables From Backup You can also restore your data tables from backup by simply clicking "Restore Tables from Backup". This will restore data from the file "C:\ltrmp_fish\fish_backup.mdb" to your app. Although it is not a menu option, you can restore data from the flash card, as well. Go to Windows Explorer and access the flash card on the "F:" drive. Go to "F:\back_up_data", and rename the file "fish_data_bkup.mdb" to "fish_data.mdb". Copy this file into your "C:\ltrmp_fish" folder in Windows Explorer, and click YES when it asks if you want to replace the file. Refresh Data in Tables Clicking "Update Number of Fish on Sheet" performs a global update and reconciliation of the number of fish on a datasheet. This updates the field in the SITE RECORD to equal the sum of all fish count values in the FISH INDIVIDUAL section, by barcode. Delete Records When deleting files, please make sure you know what you are doing, and always be sure you have a copy of your files stored somewhere in case you need to retrieve them. See File Management Considerations and Backup Data Tables above for more details. Clicking "Delete All Records From Backup Tables" purges your backup tables within the "C:\ltrmp_fish" folder of all records. This utility is most useful if you do not want to maintain backups of previously verified and processed records (records that have been sent to UMESC) on your laptop. Keeps the dataset small and nimble. Clicking "Delete All Records From Data Entry Tables" purges your primary data entry database of all records. Make sure you know what you are doing with this. This utility is provided to purge your application of records that have already been sent to UMESC (processed records). However, it will delete all records. Thus, make sure all records are verified and processed prior to doing this. The button labeled "Delete All Records From "D:\fish_flshcrd\fish_backup_fish.mdb" On Flash Card" allows you to purge your flash card, similarly to the previous two options. Note: This menu option is not available in Versions later than 1.10. The final menu items
of the maintenance section are installations pertaining to using
the application to automatically back up to the flash card.
To run these installations, simply click on each menu item and
follow the instructions provided. |
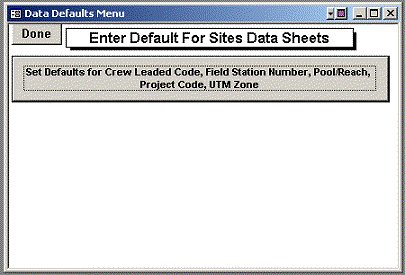
Setting Data Defaults |
| The Data Defaults Menu allows users to set data defaults for a handful of fields for the current session.
|
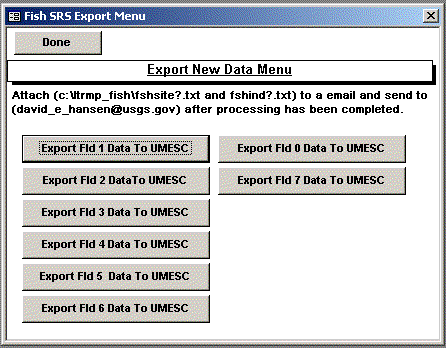
Export New Data Menu |
| Once data have been QA'ed and Verified, they can be exported to UMESC for inclusion into the Level 2 Oracle Data Tables. A few points:
|
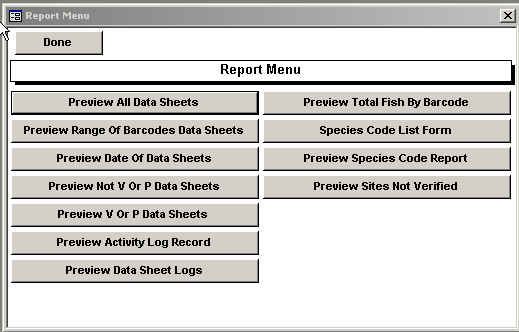
Report Menu |
| The Report Menu provides many utilities and summaries of the data. Be sure to produce paper printouts of all datasheets and datasheet logs, and mail to Dave Hansen with each export. These are the top and bottom menu items on the left-hand side of the Report Menu. Simply click the appropriate button and print. Other items are self-explanatory. If questions, contact Dave Hansen or Brian Ickes.
|
Fish Import Menu |
| The Fish Import Menu
allows the user to import the pre-loaded SITE RECORD files for
each year of data within a given field station. All sites
for an entire year are included in a sinlge import file.
You must first download the appropriate executable file - done
outside of the application. Store the file in the "C:\ltrmp_fish"
folder on your hard drive. Then, within the application,
simply click on the menu bar for your field station. Be
aware that the application will overwrite the existing data file
"C:\ltrmp_fish\fish_data.mdb"
with the contents of the executable file. You need to export
all existing records or back them up before
importing new SITE RECORD files.
An alternative method for importing new SITE RECORD data files is to simply download and save them to your "C:\ltrmp_fish" folder, then double-click on the executable file. It will automatically copy the new "C:\ltrmp_fish\fish_data.mdb" file to your "C:\ltrmp_fish" folder. |
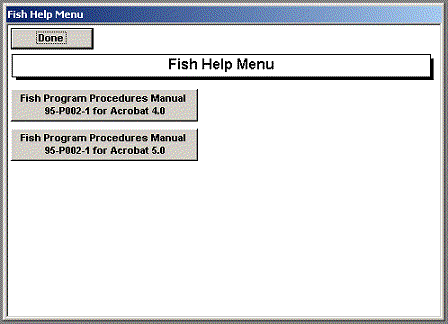
Fish Help Menu |
| The Fish Help Menu provides links to electronic versions of the Fish Component Procedural Manual.
|
| Questions, comments, concerns:
Dave
Hansen or Brian
Ickes |

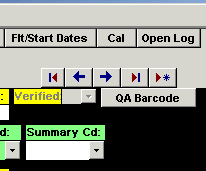 Once
you have completely entered a record, you can QA your work by
clicking the "QA Barcode" button located in the top right portion
of the SITE RECORD sub-section. This action runs a script
that evaluates all fields for valid and complete data. Warning
boxes will appear if there are deficiencies. You may run
the QA/QC script repeatedly. Each time you run it, the script
will check for errors. You
should run the QA/QC script after each collection is completed
- before leaving a site - to catch and correct
omissions or other data that cannot be retrieved later.
Once
you have completely entered a record, you can QA your work by
clicking the "QA Barcode" button located in the top right portion
of the SITE RECORD sub-section. This action runs a script
that evaluates all fields for valid and complete data. Warning
boxes will appear if there are deficiencies. You may run
the QA/QC script repeatedly. Each time you run it, the script
will check for errors. You
should run the QA/QC script after each collection is completed
- before leaving a site - to catch and correct
omissions or other data that cannot be retrieved later.